Phill,
This is fun. A lot more fun than actually doing the work! I love the to be continued... it's better than television. I've been thinking about stiffening up the keel of the boat so I look forward to your next installment. That is where I had contemplated the use of carbon fiber. I never did hear back from Bob about whether it is class legal or not, though.
I really appreciate your thoughts about what you had done and what you might do differently now. This is very helpful! Tips on tools and technique are also greatly appreciated.
Some tools and materials have become more readily available since you did your job and I'm contemplating using some of those. I think I'll go with epoxy as I have a couple of gallons left over from a friend's kayak project that needs to be used up. Of course, this brings up a question. Do you recall how many gallons of resin you might have used? I suspect that I'll still be using more epoxy than those 2 gallons and the expense will be noticeable. However, with the condition that my hull is in I really want to make sure I have the best possible bond and waterproofing.
I plan to go with 12 ounce biaxial 45/45 with no mat. These days this seems to be the stiffest e-glass configuration. And, it's reasonably easy to wet out. I need to build back some hull thickness before I go to coring. I'll use the biaxial on both sides of the core which should add maximum stiffness. If carbon fiber is allowed, I was contemplating 8 inch stripe/tape of carbon fiber from the transom and continuing up both sides of the centerboard trunk. Again, both sides of the core. I even thought about doubling the core thickness in that area. I'm planning on using half inch core because I found an outlet that has offcuts at a more reasonable price.
I've been investigating vacuum bagging as the clamping method and think that's what I'll do/try. I've been thinking about setting up vacuum clamping in my shop, so this might kick me into gear and get that done. It's tool time!
I look forward to the next installment!
KC
The Core Project
Moderator: GreenLake
60 posts
• Page 2 of 4 • 1, 2, 3, 4
![]() by K.C. Walker » Tue May 12, 2009 9:32 am
by K.C. Walker » Tue May 12, 2009 9:32 am
- K.C. Walker
- Posts: 1335
- Joined: Sun Jul 06, 2008 10:50 pm
- Location: North Stonington, Connecticut
![]() by GreenLake » Tue May 12, 2009 4:06 pm
by GreenLake » Tue May 12, 2009 4:06 pm
K.C. Walker wrote:I need to build back some hull thickness before I go to coring. I'll use the biaxial on both sides of the core which should add maximum stiffness. If carbon fiber is allowed, I was contemplating 8 inch stripe/tape of carbon fiber from the transom and continuing up both sides of the centerboard trunk. Again, both sides of the core. I even thought about doubling the core thickness in that area. I'm planning on using half inch core because I found an outlet that has offcuts at a more reasonable price.
A couple of thoughts - unfortunately all based on theory, but hopefully useful/sound anyway.
Doubling the thickness of a beam increases its strength by a factor eight.
Given this bit of theory, I'm wondering whether you're heading for overkill with your suggestion of doubled core thickness. If you realize that extra thickness using a double layer of core material, then you need to manage laminating core layers. Why put yourself through this?
Your sandwich will look like this:
=========
XXXXXXX
XXXXXXX
XXXXXXX
==oooo==
===oo====
==========
where I've tried to indicate the core with three lines of XXX, the hull with three lines of = and the skin with a single line of =, to roughly indicate the different thickness of the laminate. The ooo marks a hull void from your removal of failed laminate.
From Phill's observations we know that a single layer of mat for the skin is enough to handle the loads (mostly tensile, as the water pressure pushes from the bottom against the hull, thus trying to stretch the top of your sandwich). However, a single layer of mat is not strong enough to handle point compression loads, especially on impact (dropped boat hook). So, your focus needs to be on making sure your skin is tough enough to handle such abuse. You may not need two full layers of your biaxial cloth - sacrifice a tile of core and experiment with a single layer and a really light layer on top of that. And perhaps some other combination at the bottom of your test-tile. Let it cure, and then drop the hammer
On the hull side, you'll have mostly compression loads, and the hull is by definition thick enough to cope with point loads. There's no reason to add anything on that side of the sandwich, except where you've lost laminate. Adding a whole new layer like you propose would simply add weight - placed between hull and core, it's effect is minimized by geometry.
Now, for the missing laminate: If you replace the missing laminate with equivalent layout with epoxy, you should get something that's already stronger than what was there before, even if you simply use mat. Can you add less and save weight?
If you were to replace the missing laminate solely with a filler material, that might be enough, if that filler is at least as strong on compression as the core. Effectively, the bottom skin on your sandwich would be a bit thinner (corresponding to the thickness of the thinnest part of the hull laminate) but still thicker than the top skin. In terms of theoretical strength, the outermost (bottommost) layer of the laminate is where all the forces go anyway - adding material on the inside only helps where that outermost layer would fail. (By geometry, anything you add near the core, should get the same type of loads as the core).
You could make an argument, that the hull is over-engineered when used as a "skin" in this kind of sandwich anyway, and thus a partial hull thickness is still plenty. Using only filler in the voids would definitely save some weight and be simpler to do.
The main (theoretical) problem with just using filler, is that the strength of the hull (i.e. the bottom skin) is then variable, possibly leading to load concentrations at a place where you (rightly) suspect the existing laminate to be marginal (because of earlier stresses). How much of an issue this is, depends on geometry (how thick is the remaining laminate compared to the top skin, how gradual is the transition in thickness) and on the actual condition of the remaining hull laminate at the thinnest spots.
However, filling the complete volume with super-strong laminate might give the the same problem in reverse (an area that's much stiffer than the surroundings).
If you were to apply a single layer, well faired, over the failed laminate areas, gradually following the contours, that layer by itself should match the strength of the skin on the top of your sandwhich. The existing, partial laminate of the hull, would be in addition (and to protect that layer against point loads). So, we reason, that single layer would be enough to definitely handle the entire skin loads for the lower skin, in those areas where there is missing laminate.
If that single layer is not enough to fill the voids, you could then in good conscience simply add filler to provide a level surface for the core.
You'd use slightly less weight, and the stiffness of your lower skin might be more uniform than for either the all filler or no filler variants. But if your grinding left nicely tapered thicknesses and the remaining laminate is still thick enough and looks good, I would take a hard look at the filler only variant.
Hope you find any of this chain of reasoning of use in coming to a decision on your design.
~ green ~ lake ~ ~
- GreenLake
- Posts: 7150
- Joined: Mon Jun 18, 2007 3:54 am
![]() by Phill » Wed May 13, 2009 12:20 am
by Phill » Wed May 13, 2009 12:20 am
KC, Kayaks. Will the connections between us end. I built a 14' SOF at Cape Falcon Kayak last fall. F1 model http://www.capefalconkayak.com/f1.html Mine looks just like the one on the beach.
Greenlake and KC, you are sounding like my son. The one in the cuddy behind the hatches. He is a Civil Engineer now.
Lots of tech talk that sounds like what my thoughts were about hull thickness being sufficient, though none of my thoughts had any school learning behind them. Just kinda 'if it looked right it probably will work'.
KC, epoxy is a good choice. Part of my decision, apart from cost, was that after using epoxy, all repairs will have to be epoxy based. Polyester will not bond with epoxy.
gotta run for now.
- Phill
- Posts: 174
- Joined: Sun Jan 02, 2005 4:02 pm
- Location: Springfield, Oregon
![]() by GreenLake » Wed May 13, 2009 2:45 pm
by GreenLake » Wed May 13, 2009 2:45 pm
Phill wrote:...epoxy is a good choice. Part of my decision, apart from cost, was that after using epoxy, all repairs will have to be epoxy based. Polyester will not bond with epoxy.
Phill, there appear to be workarounds even for that problem. Here's one I found, from a source of several products I've used with good success in the past:
http://www.systemthree.com/p_sb_112.asp
They state: SB-112 is unique in that polyester resins and gel coats may be bonded to it without the use of "tie-coats". I haven't tried it myself.
~ green ~ lake ~ ~
- GreenLake
- Posts: 7150
- Joined: Mon Jun 18, 2007 3:54 am
![]() by K.C. Walker » Sun May 17, 2009 10:50 am
by K.C. Walker » Sun May 17, 2009 10:50 am
GreenLake,
Thank you for your thoughtful post regarding rebuilding of the hull thickness and core dimensions.
I do need to rebuild hull thickness and I don't see any problem with making it as rigid as possible down the center of the boat. I think as long as the stiffening is tied in to the forward bulkhead and the transom and also tied in to the seat tanks I wouldn't be creating any stress points at those locations. Tapering the edge of the core at the water line forward of the seat tanks should ease any hard spot there, even if there is a significant amount of rigidity down the keel.
I don't know what the original hull thickness would've been before I started grinding. I did grind away a crack last year and my impression was that the hull thickness was approximately 1/4 inch, though I did not measure it. I have a series of small holes drilled through my hull at this point as thickness indicators and it's thin! Some places are approximately 1/16 inch. These are the areas that were directly below the stringers. Because I am to the point where I'm getting translucent visibility into the laminate I can see impact cracks and blisters from the other side (the outside of the hull). What I have left I don't really trust so that is why I'm planning on rebuilding it with the biaxial. I am planning on several layers in the thin spots and then one layer of 12 ounce covering the entire area that I have ground out. I need impact resistance from the outside, as well.
12 ounce biaxial, done right, can weigh approximately half as much as 12 ounce mat and at the same time is stronger. The difference in weight is due to the resin having to fill the bulk of mat compared to the unidirectional layers of biaxial. I haven't yet used biaxial only cloth to skin boats. If the biaxial handles anything like cloth I see no problem with building the hull thickness back with it. From what I've read, it appears that biaxial conforms to curves better than cloth or mat. I really can't see any point in using filler (putty) when I could be adding structural strength to the skin. The core adds rigidity but it doesn't add much of any impact resistance.
Okay, because you're making me think about it a little bit (not a bad thing). I've thought about the pluses and minuses regarding weight. This is more seat-of-the-pants than engineering. I have to guess how much weight I have removed from the boat. The soggy wooden stringers, some of which were plywood, the 8th inch of mat covering the stringers, approximately an 8 of an inch of hull thickness removed from under the stringers, and then there was the resin used as fairing to fill in beyond where the stringers were attached. I'm guessing 20 pounds total removal, possibly more.
So building it back I'll be replacing the hull thickness and then adding a laminate on top of the foam. I'm figuring about 40 ft.² of core. The resin to glass ratio for biaxial is approximately 1 to 1. 3 layers of 12 ounce biaxial for the top side of the core would weigh approximately 20 pounds. So, I could be adding as little as 5-10 pounds to the boat. If I'm not real careful I could be adding 20-30 pounds.
It's been a hectic week and haven't had any time to work on the boat. Though, have ordered materials and a vacuum set up.
Thanks again for your thoughts.
KC
- K.C. Walker
- Posts: 1335
- Joined: Sun Jul 06, 2008 10:50 pm
- Location: North Stonington, Connecticut
![]() by K.C. Walker » Sun May 17, 2009 10:55 am
by K.C. Walker » Sun May 17, 2009 10:55 am
Phill,
Nice Cape Falcon! The epoxy left over from my friends kayak project was nothing to do with me building the kayak, it was all him. He's got an entire barn full of kayaks he's built. I'm afraid my kayaking is all in Tupperware boats!
KC
Nice Cape Falcon! The epoxy left over from my friends kayak project was nothing to do with me building the kayak, it was all him. He's got an entire barn full of kayaks he's built. I'm afraid my kayaking is all in Tupperware boats!
KC
- K.C. Walker
- Posts: 1335
- Joined: Sun Jul 06, 2008 10:50 pm
- Location: North Stonington, Connecticut
![]() by GreenLake » Sun May 17, 2009 2:12 pm
by GreenLake » Sun May 17, 2009 2:12 pm
K.C.,
first, all this discussion is beginning to convince me that my boat would benefit from reinforcement in that area. If it comes to that, I'll share details.
Second, taking your view that the existing hull is that thin and that suspect, one could say that your engineering analysis treats it as so much "filler" between your new (bottom) skin and the gelcoat
In other words, your goal is to arrive at a strong enough structure, assuming that the existing hull cannot be relied upon for any meaningful contribution (at least in some spots). I think that is conservative, but you are the only one who can judge the conditions (and being conservative is probably wise in this case).
I like your weight estimate. I had been worried about that while the same strength of biaxial will weigh less, the same volume might weigh more; rebuilding to the same thickness would then add weight. However, since you're confident you can keep the total weight added within reason, there's no need to worry about this effect.
Looks like you are all set.
~ green ~ lake ~ ~
- GreenLake
- Posts: 7150
- Joined: Mon Jun 18, 2007 3:54 am
![]() by K.C. Walker » Fri May 29, 2009 1:50 pm
by K.C. Walker » Fri May 29, 2009 1:50 pm
Well, it looks like I am finally going to have a couple of days without rain and I'll have some time to work on my DS. I've got the materials and planning on fitting the foam first. Phill, I'm hoping you're still checking on this thread. I noticed that you have your foam right up around the chain plates. Was wondering what your thoughts on that are at this point. Also, earlier you mentioned something about reinforcing the keel. I was curious what you had done there.
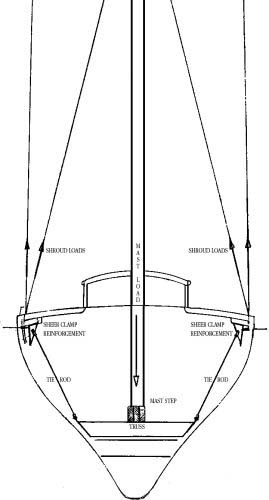
I recently ran across this image of a Concordia yawl. http://www.walkerguitars.com/photos/day ... cordia.jpg It got me thinking (a dangerous thing) about the possibility of putting a light weight floor/soleplate in the cuddy area of the boat. I could put the floor on top of the keelson and tie it into the hull at about the water line. With a couple of foam laminate bulkheads it should increase the stiffness against the push of the mast considerably. It would also add a flotation tank and keep gear out of the bilge. If this was somehow tied in to the chain plates, as it is on the Concordia it should alleviate flexing in the turn of the bilge. Anybody have any thoughts on this?
KC
- K.C. Walker
- Posts: 1335
- Joined: Sun Jul 06, 2008 10:50 pm
- Location: North Stonington, Connecticut
![]() by Phill » Fri May 29, 2009 10:46 pm
by Phill » Fri May 29, 2009 10:46 pm
huh?? huh??? yeah I'm awake......im awake....
Some Preliminary decisions I made as I modified Lollipop.
* Basic everyday, non-racing, useability to be preserved where ever possible.
* Keep rigging simple and bullet proof.
* Make the crew area as user friendly and safe as possible for my (then) pre-teen children.
* Have enough control to be competitive when racing.
That said....
I added the 8" wide foam coring up the sides to the chain plate area to add some extra structure where the compression from the rig tension, (considerable) could be better resisted. Many racers use a chainplate to chainplate cross beam, or curtin rod, to resist this compression. I wanted to keep the access to the cuddy and that entire area as 'stock' as possible. The extra coring up the sides accomplished this desire. It is not as strong as a cross beam, but getting into the forward storage area and the mast buttt (an every sail need to adjust the screw jack) is far easier with this coring instead. My preformance may be a bit hampered, but, Lollipop is stiff enough to play with the big boys.
For the keel, if you look back at the pictures http://www.walkerguitars.com/photos/daysailer/index.htm you can see a white stripe in the deepest part of the "V" along side the keelson box. My keelson and seats were not glassed onto the bottom in the strongest most craftsman like way. There is a lip around the bottom of the forward tank, keelson and seats that should sit flush with the hull, and are glass taped to secure them. Some of Lollipop's joints are less that perfect. The keelson sat so high from the bottom that the glass tape job left another 1/2" to 3/4" shelf/lip that gave that joint another flexing point. I shaped my hull foam coring to match the taping edge, but that left a more that 90 degree angle from the verticle keelson box side to the keelson lip that had no support under it to keep it from flexing and absorbing the mast compression forces. I decided after many hours of deep (no keel pun intended) thought to somehow fill that sharper than 90 angle with something.
I mixed a very micro ballon filled resin mix
Spread it in the deep angle
Added a 1/2" dowell on top of that
Spread another fillet of the micro ballon mix to cover the dowel.
This created a more or less level area so that I could just continue the matt glassing from the foam, across the lip/shelf to the keelson box and 1/2 way up the verticle side. I hoped this would tie it all together and keep the mast butt area better able to resisit the compression of the single layer of glass taping that was holding the keelson above the hull and taking no load. So far, 19 years of hard sailing, no cracking or other signs of stress.
I did the same thing along the side of the Centerboard trunk.
Shaped and attached the foam to fit the original hull-trunk joint.
Added the Micro-ballon resin/dowel/ resin fillett (see pics)
Then glassed the core top about 3" up the side of the trunk.
If you look at the final picture, you can also see where I added a half round (paper towel tube) stiffener that runs through the Centerboard pivot vertically on both sides. My thoughts were that with the thwart boards supporting the trunk from sideways movement were adding support in the wrong place. So I added these tubes (matt glassed) to dampen the side to side torque of the CB top when sailing.
Cuddy access, keelson stiffness and Trunk stiffness took some thinkin' on, but my solutions have worked for my situation. Racing preformance could be improved by better solutions. If you blow one tack or spinaker set, you will loose more than my stiffening compromises do.
Hope this fills (?) in some of the other details...
 phill
phill
ps please remember, this was done almost 20 years ago. I had not heard of Kerfing then. Maybe you cud check with a famous Luthier and a better solution exists...
Dove tailed interlocking troweled tileing tied in with ......... ....... ......zip ties
Some Preliminary decisions I made as I modified Lollipop.
* Basic everyday, non-racing, useability to be preserved where ever possible.
* Keep rigging simple and bullet proof.
* Make the crew area as user friendly and safe as possible for my (then) pre-teen children.
* Have enough control to be competitive when racing.
That said....
I added the 8" wide foam coring up the sides to the chain plate area to add some extra structure where the compression from the rig tension, (considerable) could be better resisted. Many racers use a chainplate to chainplate cross beam, or curtin rod, to resist this compression. I wanted to keep the access to the cuddy and that entire area as 'stock' as possible. The extra coring up the sides accomplished this desire. It is not as strong as a cross beam, but getting into the forward storage area and the mast buttt (an every sail need to adjust the screw jack) is far easier with this coring instead. My preformance may be a bit hampered, but, Lollipop is stiff enough to play with the big boys.
For the keel, if you look back at the pictures http://www.walkerguitars.com/photos/daysailer/index.htm you can see a white stripe in the deepest part of the "V" along side the keelson box. My keelson and seats were not glassed onto the bottom in the strongest most craftsman like way. There is a lip around the bottom of the forward tank, keelson and seats that should sit flush with the hull, and are glass taped to secure them. Some of Lollipop's joints are less that perfect. The keelson sat so high from the bottom that the glass tape job left another 1/2" to 3/4" shelf/lip that gave that joint another flexing point. I shaped my hull foam coring to match the taping edge, but that left a more that 90 degree angle from the verticle keelson box side to the keelson lip that had no support under it to keep it from flexing and absorbing the mast compression forces. I decided after many hours of deep (no keel pun intended) thought to somehow fill that sharper than 90 angle with something.
I mixed a very micro ballon filled resin mix
Spread it in the deep angle
Added a 1/2" dowell on top of that
Spread another fillet of the micro ballon mix to cover the dowel.
This created a more or less level area so that I could just continue the matt glassing from the foam, across the lip/shelf to the keelson box and 1/2 way up the verticle side. I hoped this would tie it all together and keep the mast butt area better able to resisit the compression of the single layer of glass taping that was holding the keelson above the hull and taking no load. So far, 19 years of hard sailing, no cracking or other signs of stress.
I did the same thing along the side of the Centerboard trunk.
Shaped and attached the foam to fit the original hull-trunk joint.
Added the Micro-ballon resin/dowel/ resin fillett (see pics)
Then glassed the core top about 3" up the side of the trunk.
If you look at the final picture, you can also see where I added a half round (paper towel tube) stiffener that runs through the Centerboard pivot vertically on both sides. My thoughts were that with the thwart boards supporting the trunk from sideways movement were adding support in the wrong place. So I added these tubes (matt glassed) to dampen the side to side torque of the CB top when sailing.
Cuddy access, keelson stiffness and Trunk stiffness took some thinkin' on, but my solutions have worked for my situation. Racing preformance could be improved by better solutions. If you blow one tack or spinaker set, you will loose more than my stiffening compromises do.
Hope this fills (?) in some of the other details...
ps please remember, this was done almost 20 years ago. I had not heard of Kerfing then. Maybe you cud check with a famous Luthier and a better solution exists...
Dove tailed interlocking troweled tileing tied in with ......... ....... ......zip ties
Last edited by Phill on Fri Jun 05, 2009 12:24 am, edited 2 times in total.
- Phill
- Posts: 174
- Joined: Sun Jan 02, 2005 4:02 pm
- Location: Springfield, Oregon
![]() by K.C. Walker » Sat May 30, 2009 1:20 pm
by K.C. Walker » Sat May 30, 2009 1:20 pm
Phill,
Thanks once again for your generous sharing of knowledge on this project! I am very much in agreement regarding the usability and the keep it simple variant on the use of my boat. I haven't raced (officially) and I'm only wanting to keep that option as a possibility.
I have looked at the pictures that you provided and noticed that your boat has the same "engineering" regarding the attachment of the seats, bulkhead, and keelson. I had not considered that it might be sloppy workmanship (it's so consistent), though I couldn't figure out why they would have done it that way. So, I guess I'll get a bucket of micro balloons and think about that kerfing idea! Thanks for the problem-solving I was trying to figure out how I would tie the core floor into the seats and keelson.
What I really like about this discussion is that you did this work 20 years ago and it's held up great. And, Lollipop has certainly gone through all of the testing and proved your ideas work just fine!
Thanks again,
KC
- K.C. Walker
- Posts: 1335
- Joined: Sun Jul 06, 2008 10:50 pm
- Location: North Stonington, Connecticut
![]() by K.C. Walker » Sun May 31, 2009 7:52 am
by K.C. Walker » Sun May 31, 2009 7:52 am
Well, I ignored the relatives that were visiting and fit the core foam in my boat yesterday afternoon. Although the stringer removal was a royal pain, it did make fitting the foam core much easier than having to fit it around them. It took about 3 hours to fit all but a couple of small triangles. The stuff cuts fine with a bandsaw or table saw but it doesn't like being sanded, filed, sur-formed (the little squares break out). I would imagine that a "hot knife" wire type cutter would be a good way to cut the stuff.
This Corecell is amazingly tough stuff. I wasn't sure if I would be able to walk/crawl around on top of the foam before putting the fiberglass down. No worries mate. I stepped on one of the offcuts and it felt like I was stepping on wood. I set it on edge so that I had it half-inch standing vertical and the piece was about 1 inch high. Stepping on this piece with my full weight didn't affect it at all.
I'll have some time today to be able to work on it again and plan to mark out where the foam is and sand all the edges. And then some more sanding… oh boy.
KC
Phill, I'm still thinking about that kurfing idea.
- K.C. Walker
- Posts: 1335
- Joined: Sun Jul 06, 2008 10:50 pm
- Location: North Stonington, Connecticut
Progress Report
![]() by K.C. Walker » Tue Jun 02, 2009 8:09 pm
by K.C. Walker » Tue Jun 02, 2009 8:09 pm
GreenLake,
As requested, some photos from the other day. http://www.walkerguitars.com/photos/day ... /index.htm
My CoreCell jigsaw puzzle is all marked and put away for gluing in. It took me about 4 hours total to fit it and mark it. I did some head scratching before I got really rolling on it, though. I was trying to figure out how to bevel the edges and kept breaking out the little squares, well they were triangles, of the double cut core. This foam is knife cut in about 1 inch squares to make it conform to contours. I've decided to glue it in and then cut the beveled edges where they are needed (not that much ).
The other photos really show where the stringers were. The whitish stripes are still weaker than the rest of the fiberglass but most of the bad stuff is ground out. If you look closely on one of those you can see my 1/8 inch gauge holes so I won't grind all the way through the hull.
I did a test laminate today of 18 ounce biaxial knit. Each layer comes out about .020". I'll put 2 layers where the stringers were and one layer wider than that under the foam. I'm planning on 2 layers over the foam. I'll wait a couple of days to see how stiff the 2 layers are after the epoxy cures.
I called JB at MAS epoxy and he told me I could do this whole layup in one go. I was kind of preparing my mind to try that but have decided to take it slow and do it in 3 separate operations. I will have to do a little extra sanding but I don't think it'll be too bad. I'm going to let the first layup of glass cure out before I glue down the foam. I'm going to try vacuum bagging the foam down. I'll do a dry run first, of course.
KC
- K.C. Walker
- Posts: 1335
- Joined: Sun Jul 06, 2008 10:50 pm
- Location: North Stonington, Connecticut
![]() by GreenLake » Wed Jun 03, 2009 2:32 am
by GreenLake » Wed Jun 03, 2009 2:32 am
K.C.
Thanks for the pictures.
Laminating while the first coat is still "green" should give you more strength than waiting for a full curre and then sanding. Chemical bonds vs. mechanical bonds (secondary bonds) is the way this is usually explained. You probably know that already.
But it's nice to have limited sub-parts of a project so that you can recover when something happens that's not quite to plan. I'm sure your setup is going to be strong enough as it is. If the corecell doesn't "give" very much when you walk on it, the out-of-plane loads won't have to be supported by the laminate. That's good.
There's of course no end to making the DS more stiff - I recently came across a nice discussion of ribs and stringers for powerboats - those go up along the side of the hull - so if the current project doesn't leave you with the stiffest boat on the circuit, there are more extreme things you can do next.
Just kidding.
Good luck, and posrt more pictures when you have them.
~ green ~ lake ~ ~
- GreenLake
- Posts: 7150
- Joined: Mon Jun 18, 2007 3:54 am
![]() by GreenLake » Wed Jun 03, 2009 2:51 am
by GreenLake » Wed Jun 03, 2009 2:51 am
Phill wrote:If you look at the final picture, you can also see where I added a half round (paper towel tube) stiffener that runs through the Centerboard pivot vertically on both sides. My thoughts were that with the thwart boards supporting the trunk from sideways movement were adding support in the wrong place. So I added these tubes (matt glassed) to dampen the side to side torque of the CB top when sailing.
Phill,
I guess the fact that I took this long to reply to your post should show you how puzzled I was and still am about these CB stiffeners of yours.
The thwarts prevent the hull from changing width - in addition, they prevent the CB trunk as a whole from moving sideways. Being placed high on the trunk gives them good leverage for that second task - if the trunk is stiff enough.
So, what's left? Did you observe bulging of the CB trunk walls from sideways movement of the CB? That wasn't clear to me from your description - in that case the reinforcements make some sense. If you were concerned about twisting forces on the whole trunk, I would doubt that your tubes are effective.
[Personally, I've not observed that (haven't really watched for it either) but I also no stress lines on the CB trunk.]
So can you be more precise - what did you observe? Which motion, bulging or twisting, did you attempt to address?
~ green ~ lake ~ ~
- GreenLake
- Posts: 7150
- Joined: Mon Jun 18, 2007 3:54 am
60 posts
• Page 2 of 4 • 1, 2, 3, 4
Return to Repair and Improvement
Who is online
Users browsing this forum: No registered users and 66 guests