5 dollar DIY tiller extension

For issues common to different models of DaySailer.
Except Rigging and Sails.

Moderator: GreenLake

5 dollar DIY tiller extension

Postby powpowhunter » Wed Aug 20, 2014 12:10 pm

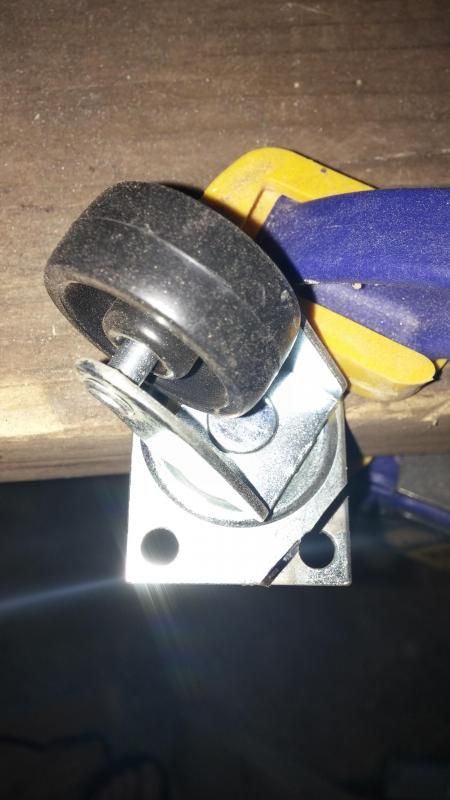
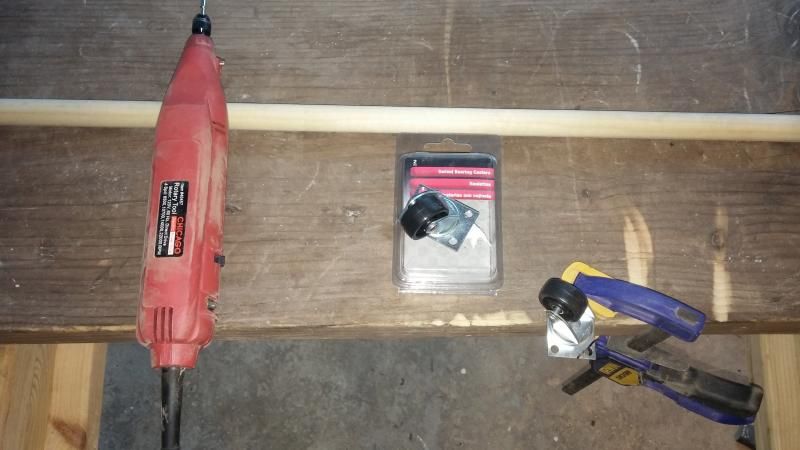
I wanted a tiller extension for the 'new' boat, but was rather shocked at the price of buying one when I looked on-line. So, for better or worse, I've decided to take matters into my own hands. After wandering around the local TrueValue for half an hour or so, I think I've come up with an elegant solution. I started with two swivel casters and a poplar dowel.
Image
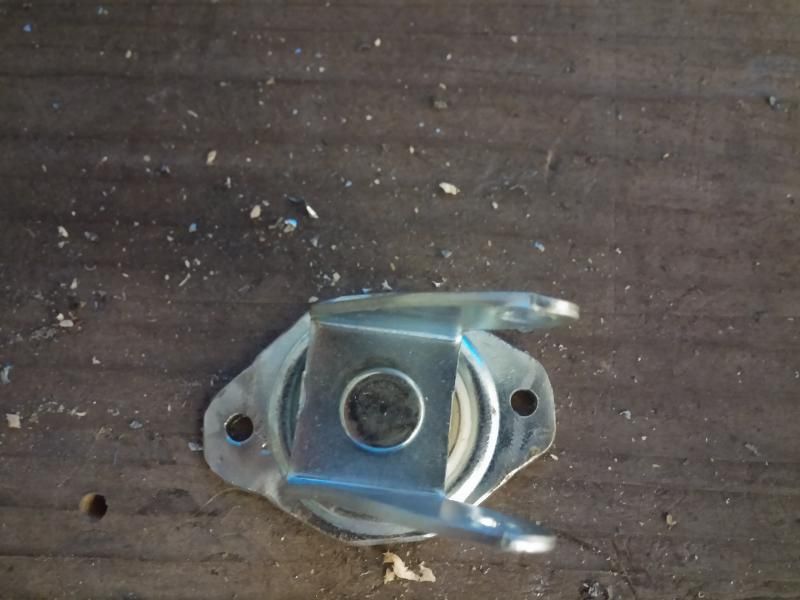
The square base of the U joint caster was a bit too big for the tiller, so I cut the corners off and drilled new holes on the centerline for screws.
Image
Image
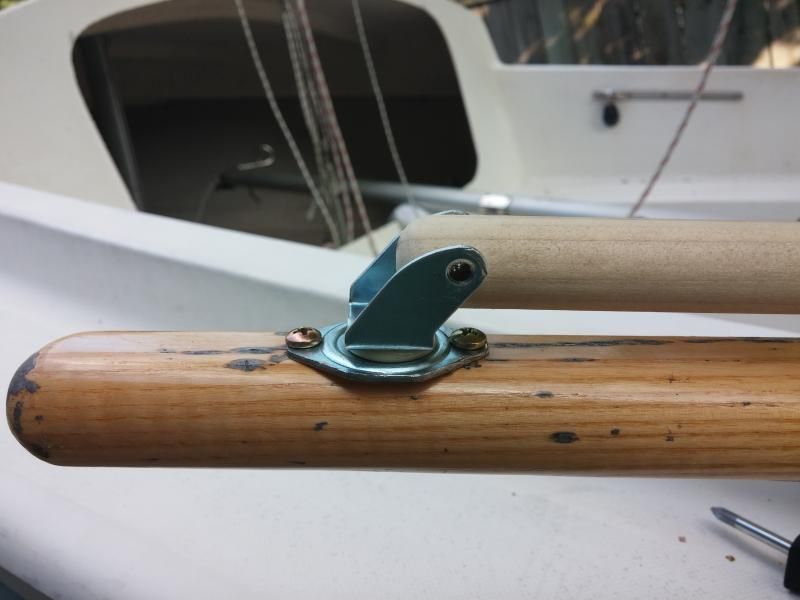
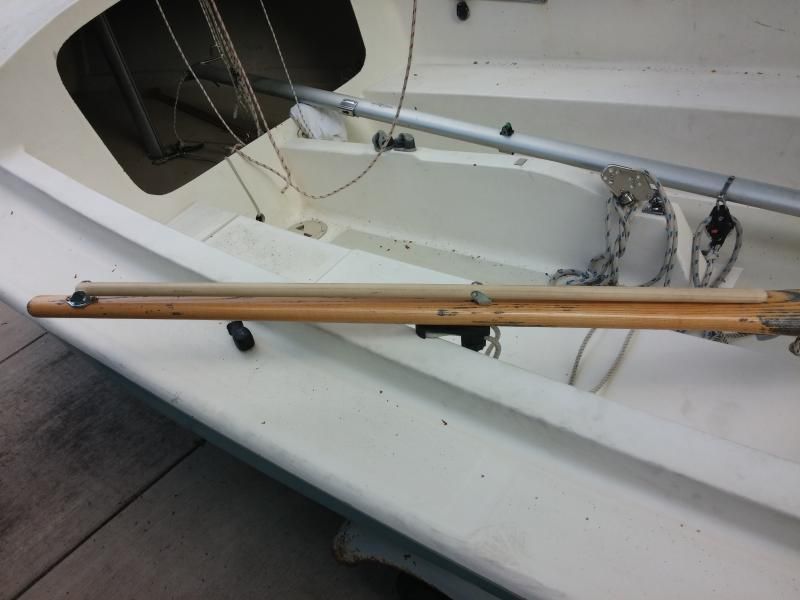
I removed the wheels from the casters by drilling out the axle rivets, and removed the base of the "clamp" caster entirely. I rounded the ends of the dowel and drilled a hole for a new axle bolt. I've mounted it in preexisting holes on the tiller from an old stick.
Image
Image
I may move the position slightly once I test it out, and may shorten the dowel as well if necessary. Right now the dowel is getting varnished. I'll post again once it's all done and I get a chance to test it out.
I'd appreciate any feedback on the design, potential flaws, etc. that anyone would care to give.
-Tyler
1977 DS2 #8389 "Tidenaut"
powpowhunter
 
Posts: 34
Joined: Sat Aug 02, 2014 3:42 pm
Location: Madison, WI

Re: 5 dollar DIY tiller extension

Postby GreenLake » Wed Aug 20, 2014 12:29 pm

Nicely done.
~ green ~ lake ~ ~
GreenLake
 
Posts: 7145
Joined: Mon Jun 18, 2007 3:54 am

Re: 5 dollar DIY tiller extension

Postby jkfinity » Wed Aug 20, 2014 12:31 pm

I think that looks Great! Awesome idea.
My suggestion after looking back and forth at pics half-dozen times, maybe to pound/rounden the base of the metal to match the curve of the tiller? But thats nit-picking. Good idea
John / Burlington Vermont / Lake Champlain
1973 DS II # 6216 "Suluhu"
jkfinity
 
Posts: 15
Joined: Wed Jun 04, 2014 10:35 am
Location: Lake Champlain, Vermont

Re: 5 dollar DIY tiller extension

Postby GreenLake » Thu Aug 21, 2014 8:12 pm

I mounted my own tiller extension as far forward as shown and later regretted that choice. As mine disconnects it would have been nice to have a full grip-width of just wood in front. I also discovered that my hands will find any bur or sharp corner eventually, no matter how minor. If rounding the base isn't an option, and it may not be, because of the risk of distorting the race, then I'd look into using a bit of epoxy putty (epoxy mixed with wood flour) to provide a smooth connection to the handle.

I would also use clear epoxy as a base on the extension. That will seal the wood and stop it from "working". Any varnish you put on that base will no longer be stressed the same way and it will take longer to develop cracks. I use polyurethane (water based) instead of varnish on my wood trim (DS1) and the epoxy seal has made all the difference. Some pieces have now gone for 4-5 seasons without needing a touchup.
~ green ~ lake ~ ~
GreenLake
 
Posts: 7145
Joined: Mon Jun 18, 2007 3:54 am

Re: 5 dollar DIY tiller extension

Postby powpowhunter » Thu Aug 21, 2014 9:15 pm

GreenLake wrote:I mounted my own tiller extension as far forward as shown and later regretted that choice. As mine disconnects it would have been nice to have a full grip-width of just wood in front. I also discovered that my hands will find any bur or sharp corner eventually, no matter how minor. If rounding the base isn't an option, and it may not be, because of the risk of distorting the race, then I'd look into using a bit of epoxy putty (epoxy mixed with wood flour) to provide a smooth connection to the handle.


I do think it is too far forward, but as I said I used one preexisting hole in the tiller as a guide, so only put had to put one more hole in. I think I will refinish the tiller this winter, as it is starting to grey in a few spots. I can seal the forward holes, use the rear as the new front hole, and then I think I will have a full hand's width+ in front of the joint.
I might be able to bend the base. There's no bearing, just the rivet axle and a ceramic washer for the swivel. They were cheap swivel casters. If it doesn't seem like the bend is going to work though, and I'm not sure that it will, I'll likely grind down the edges as much as I can to minimize the profile. I should hit the edges with the grinder again anyway, and then buff them out.

GreenLake wrote:I would also use clear epoxy as a base on the extension. That will seal the wood and stop it from "working". Any varnish you put on that base will no longer be stressed the same way and it will take longer to develop cracks. I use polyurethane (water based) instead of varnish on my wood trim (DS1) and the epoxy seal has made all the difference. Some pieces have now gone for 4-5 seasons without needing a touchup.


I'm afraid it's too late for the epoxy base. I have already started sealing the dowel. I am using polyurethane though (but just interior grade- it's what I had laying around). I've just put the third coat on and was planning on doing about 6, so I hope it lasts at a year or two. It is going to wear hard at the clip bracket, but I don't see how I can avoid that. It has to be tight to hold the extension in place when not in use. I can work on bending the clip into the best shape. I'll keep your epoxy advice in mind when it's time to refinish the tiller.
-Tyler
1977 DS2 #8389 "Tidenaut"
powpowhunter
 
Posts: 34
Joined: Sat Aug 02, 2014 3:42 pm
Location: Madison, WI

Re: 5 dollar DIY tiller extension

Postby GreenLake » Fri Aug 22, 2014 8:36 pm

Tyler,

I'm afraid interior grade PU will not last, I've had exterior grade PU fail on me after just a couple of seasons. When the inevitable happens, just take it down to bare wood and start over. Meanwhile, look into it for your tiller. For a pamphlet check out the guide for treating exterior wood at SystemThree's website.
~ green ~ lake ~ ~
GreenLake
 
Posts: 7145
Joined: Mon Jun 18, 2007 3:54 am

Re: 5 dollar DIY tiller extension

Postby powpowhunter » Sat Aug 23, 2014 11:46 am

For the cost of a dowel I will just start over again from scratch when it's time. Thanks for the advice.
-Tyler
1977 DS2 #8389 "Tidenaut"
powpowhunter
 
Posts: 34
Joined: Sat Aug 02, 2014 3:42 pm
Location: Madison, WI

Re: 5 dollar DIY tiller extension

Postby GreenLake » Sat Aug 23, 2014 6:34 pm

There's that! :)

I sometimes spend more in epoxy than the material it's covering, but the rationale is usually that I don't like to spend the time to re-assemble things. Last item like that was $5.00 worth of bamboo for a spinnaker pole. I spent $10.00 in glass and epoxy for a light sheath, but otherwise I'd have to rebuild the thing every year - this way it's held up multiple seasons.

For your tiller, taking it to bare wood makes sense, but you are right about the dowel.

When I refinished my tiller I used some oxalic acid to lighten some discolored spots that sanding hadn't quite elminated. That worked quite well, actually.
~ green ~ lake ~ ~
GreenLake
 
Posts: 7145
Joined: Mon Jun 18, 2007 3:54 am

Re: 5 dollar DIY tiller extension

Postby Baysailer » Sun Aug 24, 2014 1:47 am

I've had and used the same basic tiller extension for years with some minor differences, It was a bolt through caster and for the tiller used some 1" marine aluminum I had. I wasn't sure how it would hold up to the elements but it has held up and has worked pretty good too.
Baysailer
 
Posts: 193
Joined: Sun Sep 03, 2006 8:18 pm
Location: Pillar Point, NY


Return to Repair and Improvement

Who is online

Users browsing this forum: No registered users and 7 guests