I put together a little blog post detailing how I reattached a spreader bracket to my aluminum mast where the original screws were almost completely rusted through. I thought I would share it here for those who find it interesting or who have any feedback for me. The link is https://medium.com/@pcardune/reattachin ... af58d7a6d1 if you want to read it on medium. Alternatively, I've copy/pasted the text below:
The Problem:
At some point, a previous owner attached the spreader bracket to the mast using what appeared to be very inappropriate fasteners. On either side of the spreader bracket were two holes. On the port side, the spreader bracket was attached to the mast using two 1/4" lag bolts and on the starboard side it was attached using two size 12 sheet metal screws. All the screws were completely rusted through and looked like they would break in half at any moment.
As you can see in this photo [https://cdn-images-1.medium.com/max/2000/1*xWMiCFhGjzJE0HECpr3w6A.jpeg], the screws were in really bad shape. While it kind of makes sense that you would use sheet metal screws to attach the bracket to the mast, using a lag bolt doesn’t make any sense at all. The threads on a lag bolt do not go all the way to the top of the bolt so when screwed into the thin walls of the aluminum mast, there is barely anything keeping the screw attached.
Failed Solution #1
At first, I thought I could just replace the screws with new ones made of stainless steel so they wouldn’t rust away. After buying matching screws and trying to install them, it became clear very quickly that this wasn’t going to work. When a sheet metal screw is drilled into aluminum, the threads cut corkscrew grooves into the aluminum to create a tight fit. If you try to put new screws into old grooves, you will not get a tight fit and the screws will come out of the holes easily. The only option is to drill a larger hole and install larger screws, but unfortunately in my case the holes were already as big as they could get without completely destroying the bracket.
The Final Solution
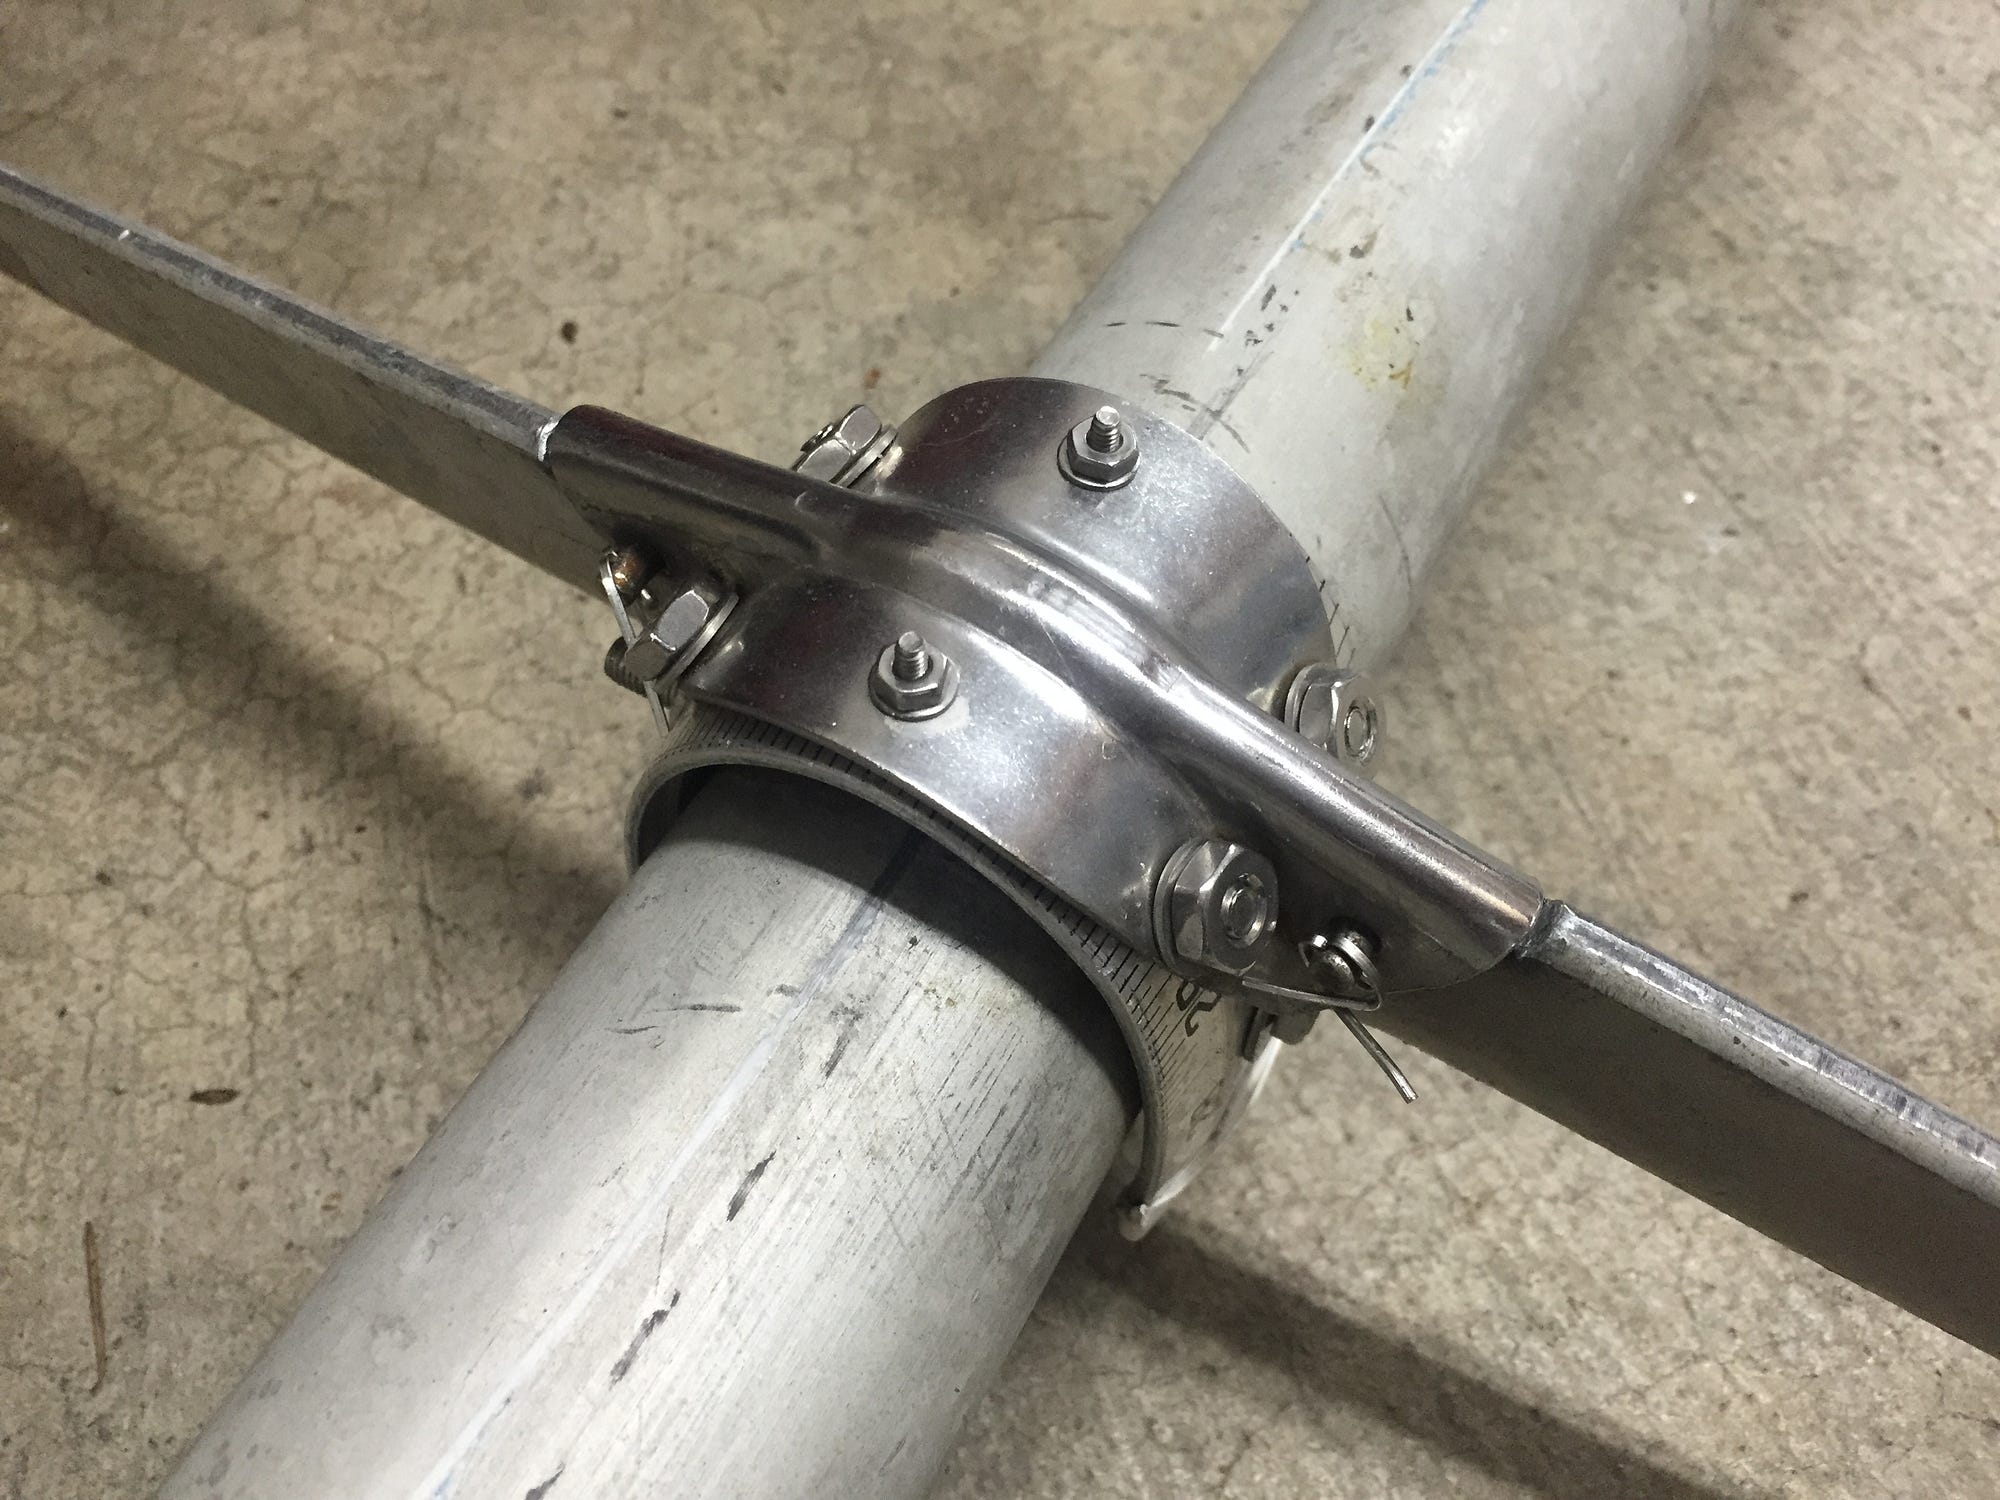
While at the hardware store, I randomly encountered a former boat builder who gave me a really good suggestion: bolt the spreader bracket to a brand new piece of aluminum and then bolt the aluminum to the mast using a through bolt. It’s easier to describe with a picture: https://cdn-images-1.medium.com/max/200 ... RN2dA.jpeg
Here are the steps I followed to build this out:
1. Find some scrap aluminum. I went to Ballard Reuse in Seattle where you can buy old junk and found an aluminum ruler that happened to be the perfect width and thickness, which I bought for $10. How did I know it was aluminum? It said so on the side. Also you can bring a magnet, which won’t stick to aluminum.
2. Bend the aluminum into the shape of the mast. Before cutting the ruler down to size, I bent it in half around the mast. It was surprisingly easy to do using leverage points at either end of the ruler. First I just put my foot halfway down the length of the ruler and pulled up from one end to form the initial bend. Then I put the bend under the mast and kept pushing until it wrapped all the way around the mast. I didn’t worry too much about getting the shape perfect, because the bolting process will force it to fit better.
3. Cut the aluminum to the appropriate size. I used some clamps to clamp the bent aluminum ruler to a work table and then used a hack saw to cut off the long ends. Before making the cut, I measured the width of the mast to get an idea of how long the bent aluminum piece needed to be in order to wrap most of the way around the mast.
4. Drill holes into the aluminum. Using a regular drill bit, I drilled 6 holes into the aluminum such that they would line up with the 6 holes on the spreader bracket. Drilling through aluminum is only slightly more work than drilling through wood so it didn’t take that much effort and I didn’t have any trouble keeping the drill steady on the curved surface of the bent aluminum ruler.
5. Bolt the spreader bracket to the aluminum. Using stainless steel bolts that I had carefully measured to be the right size (I brought the spreader bracket and the bent aluminum with me to the hardware store) I bolted the bracket to the bent aluminum. In the process of tightening down the bolts, the aluminum easily bent to closely match the internal contour of the spreader bracket itself.
6. Drill through-holes into the bent aluminum. I mounted the bent aluminum back to the work bench and guestimated the right place to drill all the way through both sides of the bend in one go. I wanted to make sure the two holes were aligned such that a bolt would easily go through both of them.
7. Drill through-holes into the mast. I placed the spreader bracket with the bent aluminum onto the mast and marked the appropriate location of for the through holes on the mast using a pencil. I then drilled through these holes one at a time and prayed that they would be aligned properly. It worked.
8. Bolt the bent aluminum to the mast using a through bolt. Again I carefully measured the proper length of the bolt I would need to go all the way through the mast and the bent aluminum. I used a stainless steel bolt with a nut and washer and tightened it down well, further bending the aluminum ruler.
9. Attach the spreaders to the spreader bracket. This was a little tricky because the through bolt got a bit in the way of the spreaders. Ultimately I had to saw a couple millimeters off of the spreader itself in order to get it to fit snugly against the bolt head but in the end it worked.
10. Wrap cut end of bent aluminum with rigging tape. The hack saw leaves a pretty sharp surface on the aluminum so it’s a good idea to tape it with rigging tape so you don’t accidentally cut yourself or other things with it.
With all the bolts attaching the bent aluminum to the spreader bracket, the bracket sits proud on top of the mast. While this doesn’t look that great, it’s quite functional. Now the whole set up feels super strong and not like it’s going to fall apart under heavy wind. I’ve taken the boat out sailing with this setup and it works great.
Important Note: In the near future, I plan to disassemble this and add some kind of barrier between the stainless steel bolts and the aluminum components to avoid galvanic corrosion. (Tef-Gel?)
Reattaching spreader bracket to mast
Moderator: GreenLake
2 posts
• Page 1 of 1
Reattaching spreader bracket to mast
![]() by pcardune » Sun Aug 09, 2015 6:41 pm
by pcardune » Sun Aug 09, 2015 6:41 pm
I have a circa 1958 Daysailer and I live in Seattle. Find me on facebook: http://fb.com/pcardune.
- pcardune
- Posts: 4
- Joined: Wed Jul 15, 2015 2:58 am
- Location: Seattle, WA
Re: Reattaching spreader bracket to mast
![]() by GreenLake » Sun Aug 09, 2015 6:45 pm
by GreenLake » Sun Aug 09, 2015 6:45 pm
Thanks for sharing this in detail.
~ green ~ lake ~ ~
- GreenLake
- Posts: 7146
- Joined: Mon Jun 18, 2007 3:54 am
2 posts
• Page 1 of 1
Return to Repair and Improvement
Who is online
Users browsing this forum: No registered users and 10 guests